funwithstuff Spatial Kit is a Final Cut Pro 11 plug-in for stereo 3D video creators.
Available now from FxFactory, Spatial Kit allows you to correct common errors in Spatial/Stereo 3D footage. It works with footage from non-native Spatial apps on the iPhone, footage shot on stereo lenses on mirrorless cameras, and with side-by-side footage synced from multi-camera rigs.
Final Cut Pro 11’s support for Spatial video includes Convergence controls, but some cameras require adjustments beyond the standard possible range. More problematic, there’s no support for disparity correction, nor for other issues that can crop up when working with stereoscopic images. Lens misalignment is very common, and cannot be corrected with the standard FCP tools — not even with custom effects made in Motion.

Currently, Spatial Kit offers the only set of FCP tools to correct the left and right angles of stereoscopic 3D clips independently, and is designed for professional 3D workflows in FCP.
First, you’ll need to make sure FCP knows your clips are stereoscopic, and it treats SBS and Spatial clips in the same way. In the Info Inspector, set Stereoscopic Conform to “Side by Side”. If you’re working with a left-right pair, you’re ready to go. However, if you’re working with footage shot with a dual lens on a single mirrorless camera, the footage will be in right-left order, and you should check the “Swap Eyes” checkbox in the Stereoscopic section in the Inspector first.
Note: if you’re working with single clips from two separate cameras, you should perform initial setup before you use Spatial Kit. First, you should uncheck Stereoscopic and use the Transform tools to position each angle to the left and right of a double-width stereoscopic timeline, using Both Eyes view. If you wish, Spatial Kit can then be used on an Adjustment Clip above both angles to control both angles at once. Alternatively, you can export the left and right angles together to a new clip, then reimport it and use Spatial Kit for further adjustment.
Effects in Spatial Kit
- Alignment
- Correction
- Utility
While each effect includes built-in Help in the Inspector, here we’ll take a more detailed look.
Alignment
To correct issues with vertical disparity, horizontal disparity, or differences in rotation, add your clips to a Spatial/Stereo 3D timeline, then apply Stereo Offset Combo, Stereo Offset Duo, Stereo Offset Manual, or Stereo Offset Solo. The Duo, Manual and Solo effects can also correct scale differences between the two angles. Most of these options offer on-screen controls:
- Stereo Offset Combo
This uses one on-screen control, adjusting the two angles in opposite directions, and scale together. This is the quickest approach, and if you don’t expect to have to change scale of one angle, it’s usually the recommended option.
- Stereo Offset Duo
This uses two on-screen controls, adjusting the two angles independently. If you would prefer more control over exactly how each angle is moved, or if you need to control scale of on angle, this is for you.
- Stereo Offset Solo
This uses one on-screen control, adjusting one angle alone. If you only want to adjust one of the two angles, this option is the one to go for.
NOTE: If you’re working with clips from two separate cameras, make sure these clips are not marked as Stereoscopic. Instead, position them manually to the left and right of the frame, then place an Adjustment Clip above both source clips. This clip should be marked as Stereoscopic, and then you can use one of these alignment tools.
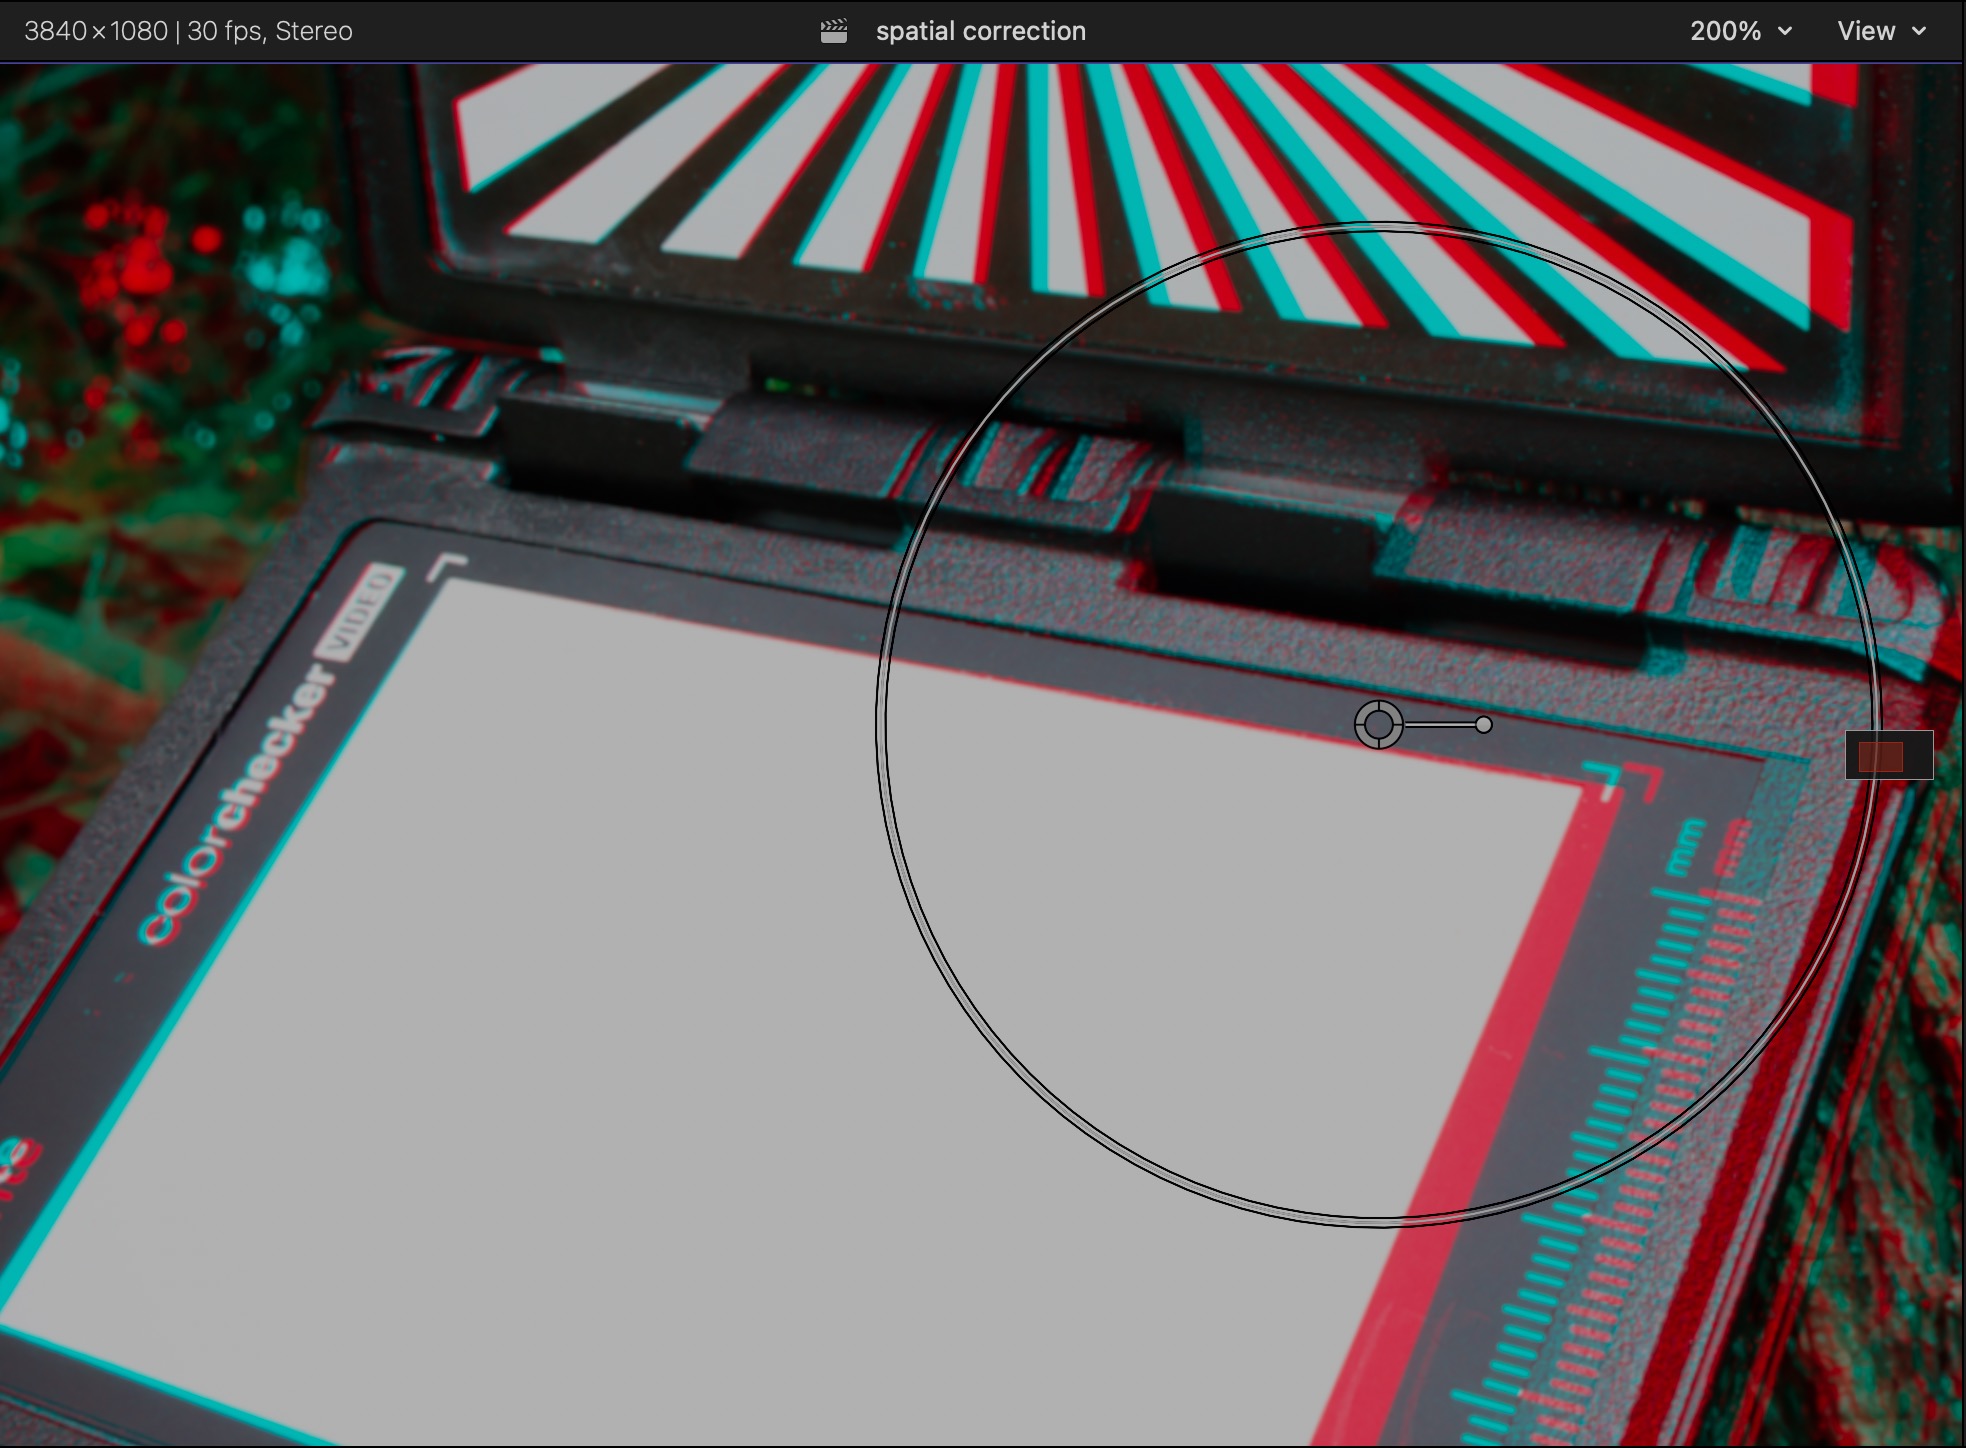
Using the on-screen controls
Whichever option you choose, the best strategy is to zoom in to see detail, and to choose the Anaglyph viewing mode.

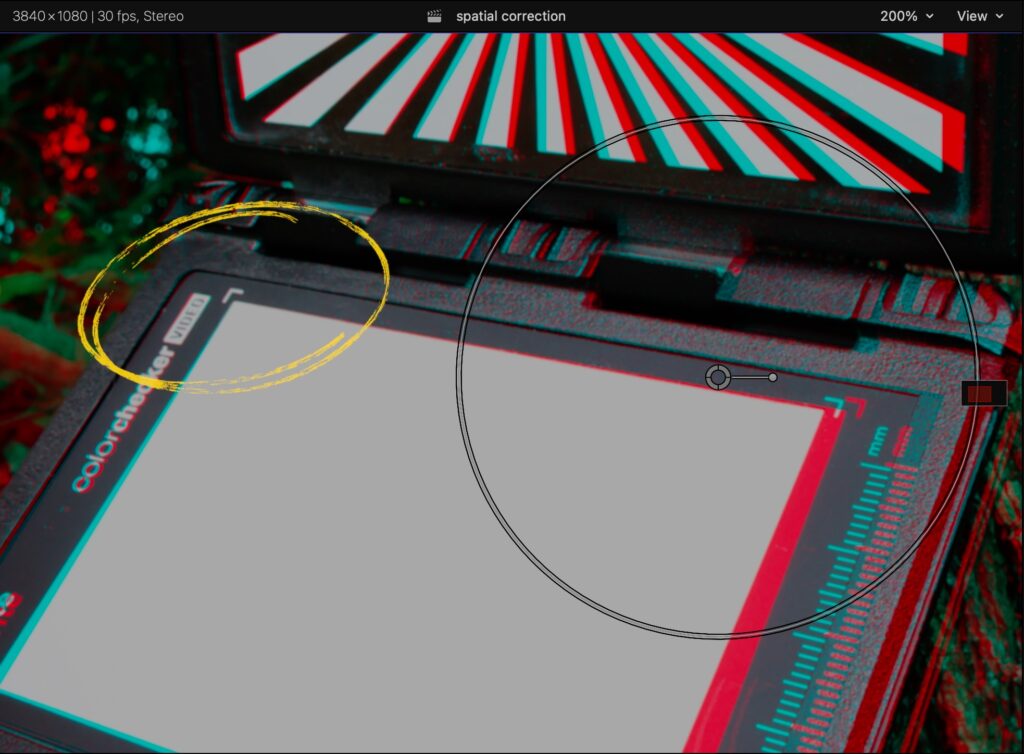
1️⃣ Choose an object to act as the convergence point, likely an object in the middle of the frame, then move the central crosshair of the on-screen control(s) to align the red and cyan images on that object, both vertically and horizontally.
When complete, red and cyan will still be offset horizontally in other parts of the image. This is normal, as it creates apparent depth in 3D. However, if the red parts of the image are higher or lower than the cyan parts in some parts of the image, you may need to adjust the angle or the scale.
2️⃣ Use the circle around the crosshairs to adjust scale, and note that (by design) you’ll need to drag the circle out a short distance from the center before you see any change. Note that dragging this control again will cause it to reset, so for further adjustment, it’s recommended to hold the ⌥ key and drag the numbers in the Inspector.
3️⃣ Use the arm to the right of the crosshair to adjust angle.
Note that with the Combo effect, both angles will automatically scale to compensate for horizontal disparity adjustments. If you’re working with a non-standard aspect ratio, you can turn this off, manually adjust scale, or change the “Auto-Scale Factor” to suit.
Using the Inspector controls
If you prefer not to use on-screen controls, you can use the Inspector controls in any of these effects to adjust any of these options. However, you should avoid using the sliders, as they do not cover the full possible range of values. Instead, drag on the numbers adjacent to the sliders, and for finer control, hold the ⌥ key as you drag on the numbers.
For even finer control, you can use:
- Stereo Offset Manual
This manual effect allows you to correct offsets, scale and angle for the left and right angles separately, but does not offer on-screen controls. Note that as the Inspector values more closely reflect actual transform values, they will not match the values shown in the effects with on-screen controls.
Copying alignment to other clips
Crucially, alignment only needs to be performed once for a specific camera setup.
When you’ve dialled in the right settings, you can simply copy this clip, then use Paste Attributes to add the same effect to every other clip shot under the same conditions. You can also drag an effect directly from the Inspector to other clips in your timeline, or save specific settings with the Save Effects Preset button at the bottom of the Inspector.
If you’re using a dual lens camera, these settings should never change. If you’re using a dual camera rig, you’ll need to go through this process again if either of the cameras are repositioned or removed from the rig.
Remember that sequential clips in a timeline should position the subject at roughly the same depth position. To do this, it’s best to adjust the Convergence control rather than the offset controls here.
Correction
Also included in Spatial Kit are two effects to control sharpness and color on a single angle at a time. These are most useful when working with footage from an iPhone, especially with footage from third-party apps.
- Stereo Color Adjustments
This applies the Color Adjustments effect to a single angle at a time. This is helpful if one of your two angles differs from the other in exposure, saturation, temperature, or any other color factor.
- Stereo Unsharp Mask
This allows you to apply an Unsharp Mask effect to a single angle at a time. This is useful if one of your angles is softer than the other, which is the case with most clips shot on iPhone.
The best way to use these effects is to view with Both Eyes. If you’re correcting color, show the Video Scopes, and put them into Vertical mode. Now, as you adjust the sliders, you’ll be able to make the scopes match up across both angles. For sharpness, simply zoom in and compare as you adjust.
Utility
Also included is a utility effect that enabled more complex operations:
- Stereo Selector allows you to view only one of the two angles in a stereo clip. To use it, apply the effect to a clip, then duplicate it above or below the original at the same point in time and change the visible eye on the duplicate clip. You can now adjust each angle independently.
Finally, because the standard Transform controls in the Video Inspector don’t apply to each of the left and right stereo angles independently, an effect is included to allow this:
- Stereo Transform allows you to Position, Rotate and Scale both angles in a stereo clip at the same time. This allows you to make minor corrections to horizon lines, to reframe, and to punch in.
Creating true 3D titles and generators
Stereo Selector can let you create complex 3D effects from some titles and generators. For example, if you use this strategy with a 3D title, you can position the text in the left angle a little to the right (-X), and the text in the right angle a little to the left (-X). This simulates how text would appear with a true 3D camera, and creates a stereoscopic effect with the text coming towards you (negative convergence). If you reverse these numbers, the text will appear to recede from the viewer.
Note that titles with a “Title Background” element — those titles which affect clips beneath them — cannot be used with this strategy. The “3D” category of titles do work, as does the flexible “Custom” title in the “Build In/Out” category. However, the “Basic Text” category will not work. If you have Apple’s excellent app Motion, you may be able to open a title and delete the Title Background before saving a copy — but this can come at the cost of functionality.
The same strategy also makes it possible to create stereo 3D particle effects. To do this, add an instance of the funwithstuff Emojisplosion plug-in to your timeline and adjust the settings as desired. Apply Stereo Selector, duplicate the clip above the original at the same point in time, then change the visible eye in the duplicate clip. Offset the horizontal camera position between the two angles to create a stereo 3D effect, but as you’re controlling the camera position rather than the content position, swap the positive and negative X values around (left eye: +X, right eye: -X).